Frontend Plugin SDK
The examples below demonstrate usage of the various services and functionalities.
navigation
Used to create pages in the application and navigate to them.
To add a page:
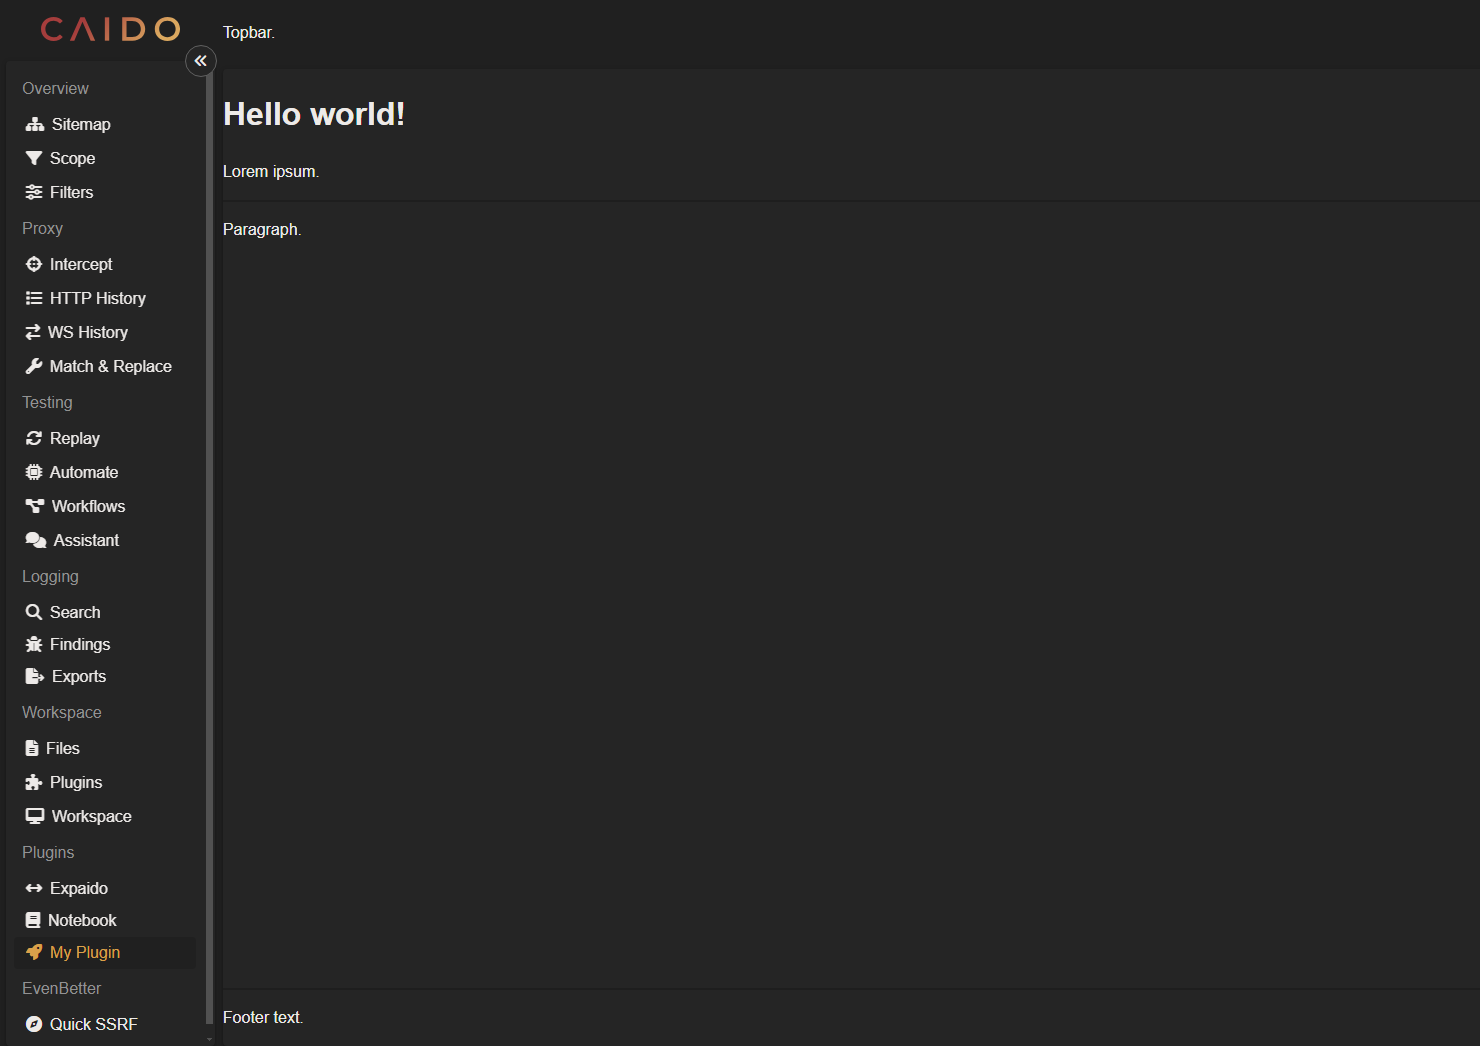
sdk.navigation.addPage("/my-plugin-page", {
    body: card;
    topbar: bar;
});
This creates a page of which the contents are the card you will learn how to create below.
The topbar property is optional and appears to the right of the Caido logo in the top-left corner.
WARNING
The inclusion of a topbar will remove the Browser button, >_Commands button, Forwarding/Queuing button, Project Dropdown Menu and Account Menu from the top-right corner of the Caido UI in your plugin page.
To navigate to a page:
sdk.navigation.goTo("/my-plugin-page");sidebar
Used to add an entry to the left-hand navigation menu in the Caido user-interface to navigate between pages.
sdk.sidebar.registerItem("My Plugin", "/my-plugin-page", {
  icon: "fas fa-rocket",
});
The icon property is optional and adds a FontAwesome icon at the leading side of the button.
INFO
- The
groupproperty is optional and dictates which category the entry will be under in the left-hand side menu. - The
isExternalproperty is optional and takes a boolean value of true if the path points to an external URL.
ui
Used to create visual elements. Content options for each element are also provided. These elements provide a way to sectionalize the user-interface of your plugin.
To create a button:
const deleteButton = sdk.ui.button({
  variant: "primary",
  label: "Delete",
  trailingIcon: "fas fa-trash-can",
  size: "small",
});
All button properties are optional and include:
variant- Specifies the button type and can have a value of"primary","secondary"or"tertiary".label- Specifies the inner string within the button.leadingIcon- Adds an icon at the leading side of the button.trailingIcon- Addsan icon at the trailing side of the button.size- Specifies the button size and can have a value of"small","medium"or"large".
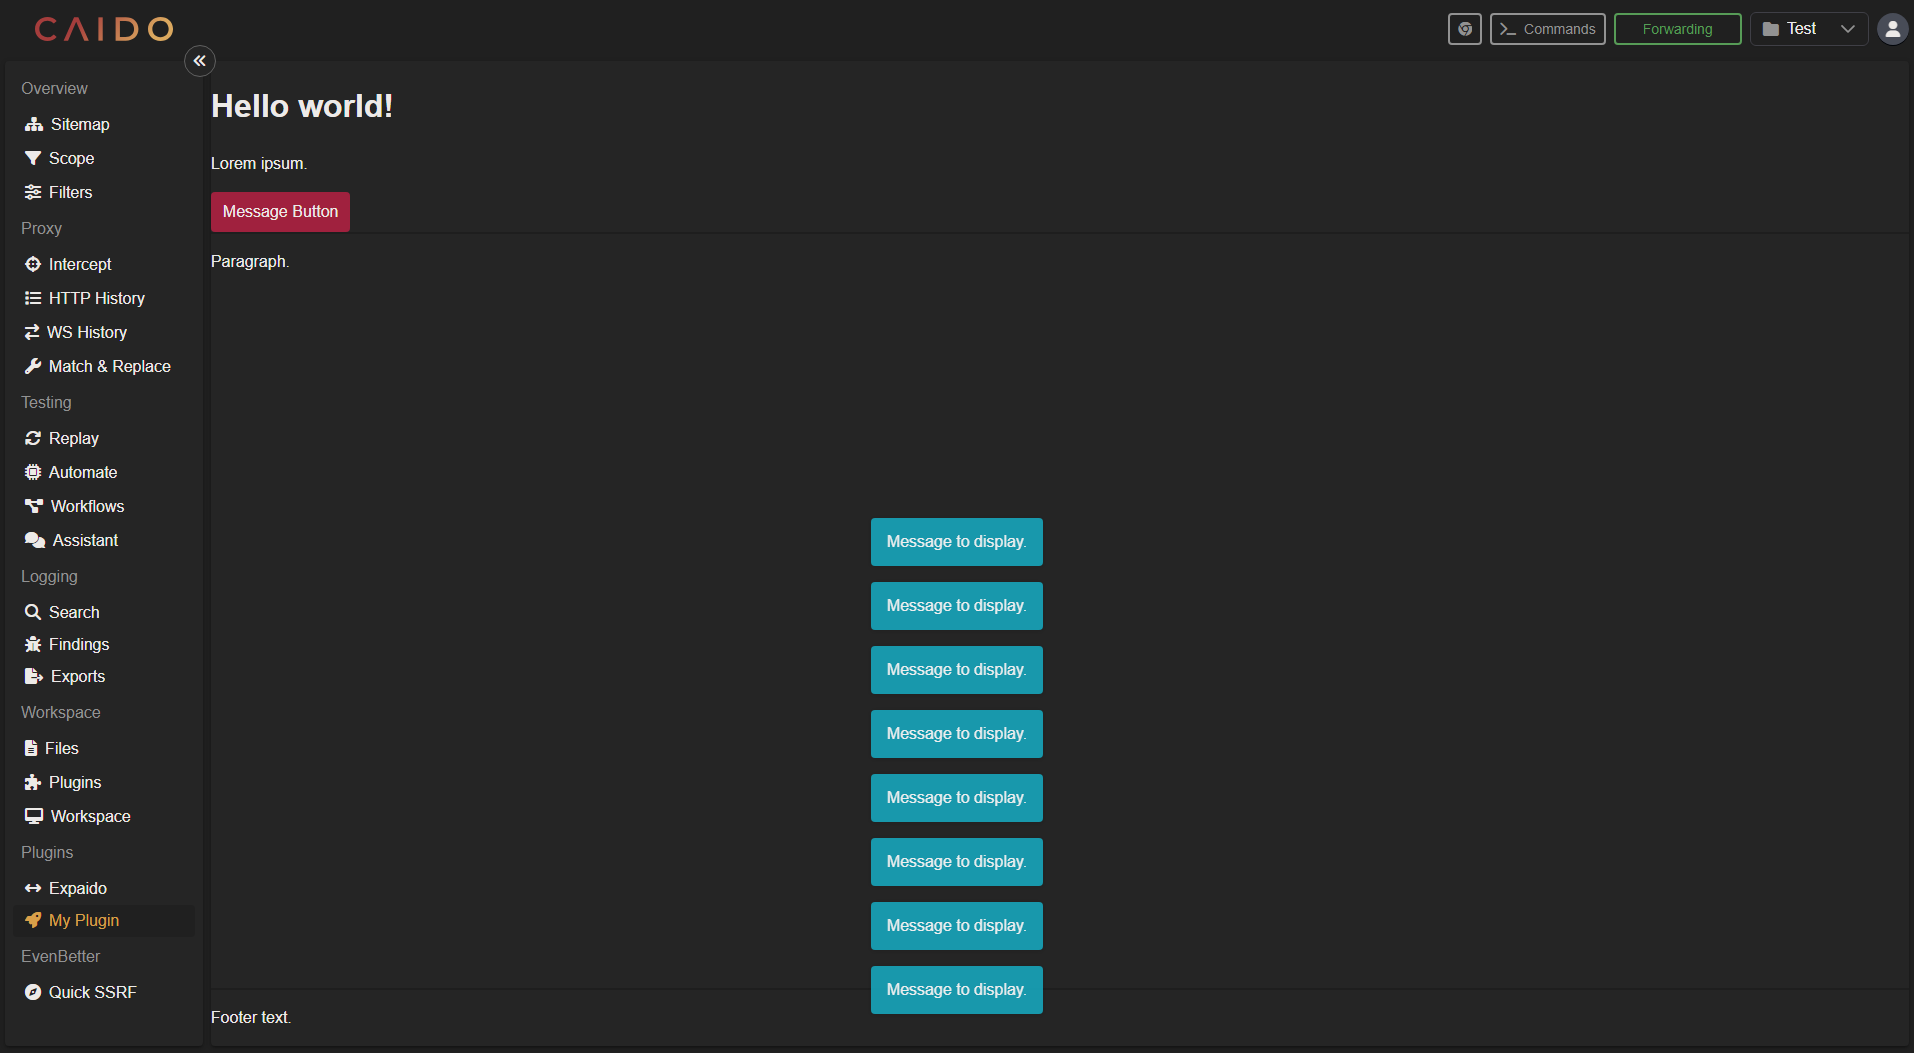
To create a card:
const card = sdk.ui.card({
  header: headerContainer,
  body: bodyText,
  footer: footerText,
});
A card is a layout component. Cards consist of header, body and footer properties.
All properties are optional. The value of each property is a defined HTML element.
TIP
To use multiple HTML elements, combine them using <div></div> tags:
import type { Caido } from "@caido/sdk-frontend";
import type { API } from "starterkit-plugin-backend";

export type CaidoSDK = Caido<API>;

const createPage = (sdk: CaidoSDK) => {
  const headerText = document.createElement("h1");
  headerText.textContent = "Hello world!";

  const subText = document.createElement("p");
  subText.textContent = "Lorem ipsum.";

  const bodyText = document.createElement("p");
  bodyText.textContent = "Paragraph.";

  const footerText = document.createElement("p");
  footerText.textContent = "Footer text.";

  const headerContainer = document.createElement("div");
  headerContainer.appendChild(headerText);
  headerContainer.appendChild(subText);

  const bar = document.createElement("p");
  bar.textContent = "Topbar.";

  const card = sdk.ui.card({
    header: headerContainer,
    body: bodyText,
    footer: footerText,
  });

  sdk.navigation.addPage("/my-plugin-page", {
    body: card,
    topbar: bar,
  });
};

export const init = (sdk: CaidoSDK) => {
  // Register commands
  // Commands are registered with a unique identifier and a handler function
  // The run function is called when the command is executed
  // These commands can be registered in various places like command palette, context menu, etc.

  // Register page
  createPage(sdk);

  // Register sidebar
  sdk.sidebar.registerItem("My Plugin", "/my-plugin-page", {
    icon: "fas fa-rocket",
  });
};
The init function contains the createPage(sdk) function to register the page and the .registerItem method to make it available in the sidebar when the plugin initializes.
To create a well:
const well = sdk.ui.well({
  header: title,
  body: paragraph,
  footer: advisory,
});
A well is a layout component. Wells are similar to cards in that they consist of header, body and footer properties.
All properties are optional. The value of each property is a defined HTML element.
To create a request editor:
const reqEditor = sdk.ui.httpRequestEditor();To create a response editor:
const respEditor = sdk.ui.httpResponseEditor();scopes
Used to set, create, update and delete Scope Presets, ensuring your plugin is directed at desired hosts.
To get all Scopes Presets:
const allScopes = sdk.scopes.getScopes();This returns a list of Scope Presets.
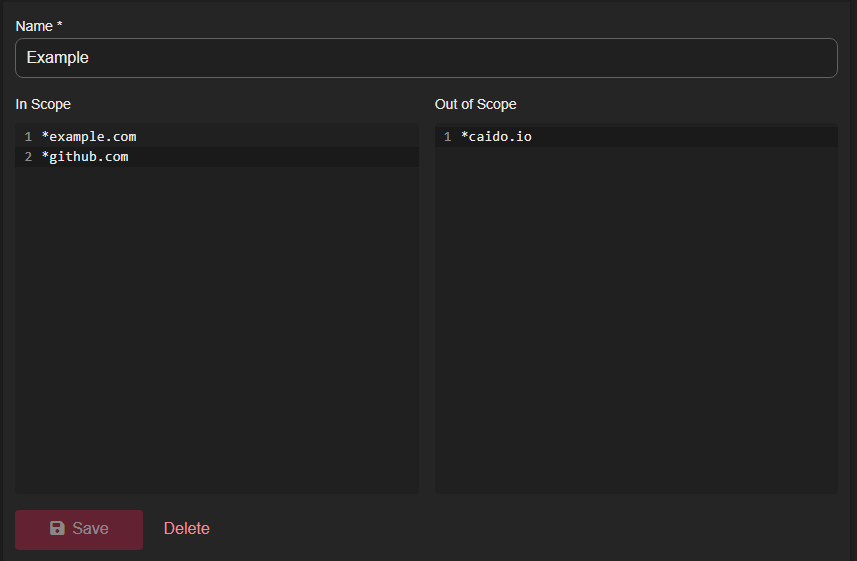
To create a Scope Preset:
newScope = sdk.scopes.createScope({
  name: "Example",
  allowlist: ["*example.com", "*github.com"],
  denylist: ["*caido.io"],
});
This creates a Scope Preset in which example.com, github.com and all their subdomains are in-scope while caido.io and all of its subdomains will be out-of-scope.
To update a Scope Preset:
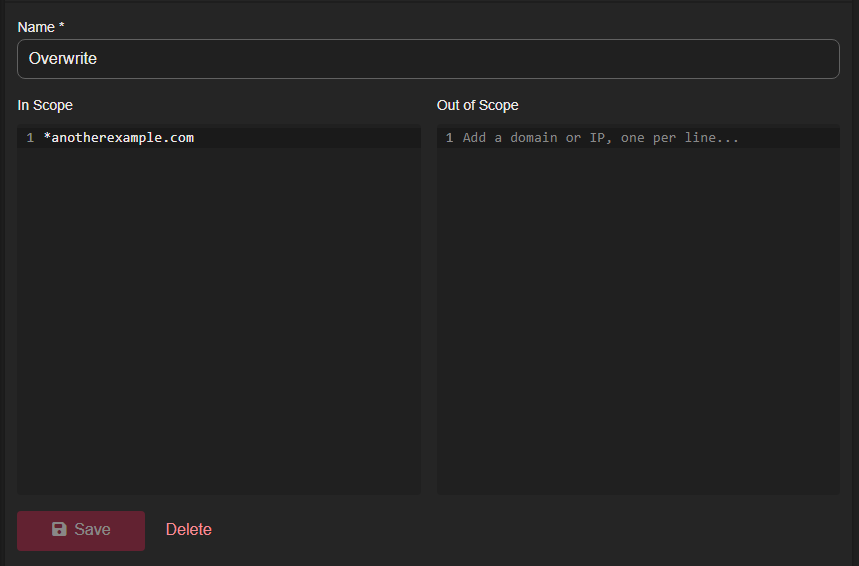
sdk.scopes.updateScope("1", {
  name: "Overwrite",
  allowlist: ["*anotherexample.com"],
  denylist: [],
});
This updates a Scope Preset specified by it's id number which correlates with the number of Scope Presets in the current project. This will overwrite the rule settings.
To delete a Scope Preset:
sdk.scopes.deleteScope("1");This deletes a Scope Preset specified by it's id number.
findings
Used to create Findings.
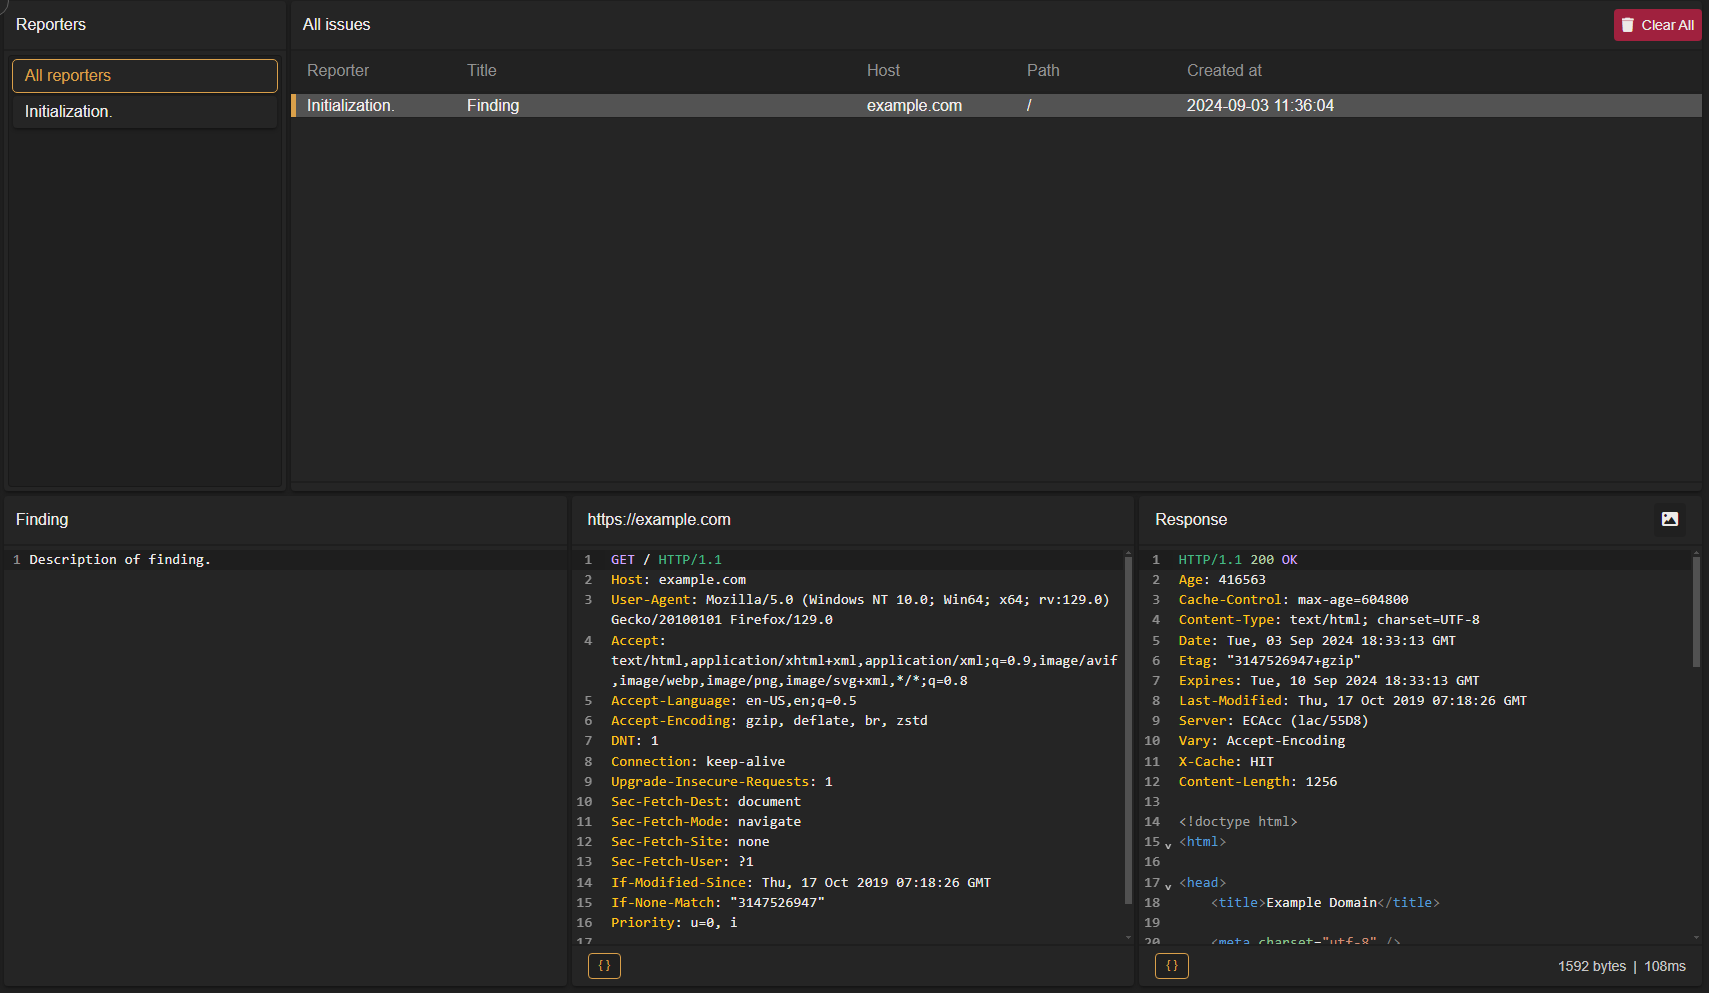
sdk.findings.createFinding("1", {
  title: "Finding",
  description: "Description of finding.",
  reporter: "Initialization.",
});
This creates a Finding based on the id number associated with a request. This is the same id number that is assigned to the request within the HTTP History tab.
The title property assigns a value to the Title column in the Findings table.
The description property is optional and can be used to provide additional information.
The reporter property assigns a value to the Reporter column in the Findings table and can be used to specify what component created the entry.
INFO
- The
dedupeKeyproperty is optional and ensures a duplicate Finding is not created. - Clearing the HTTP History will offset the id numbers associated with the request but the original id assigned will still be paired.
commands
Used to register actions to expose functionality, bind actions to the user-interface and implement business logic.
To register a command:
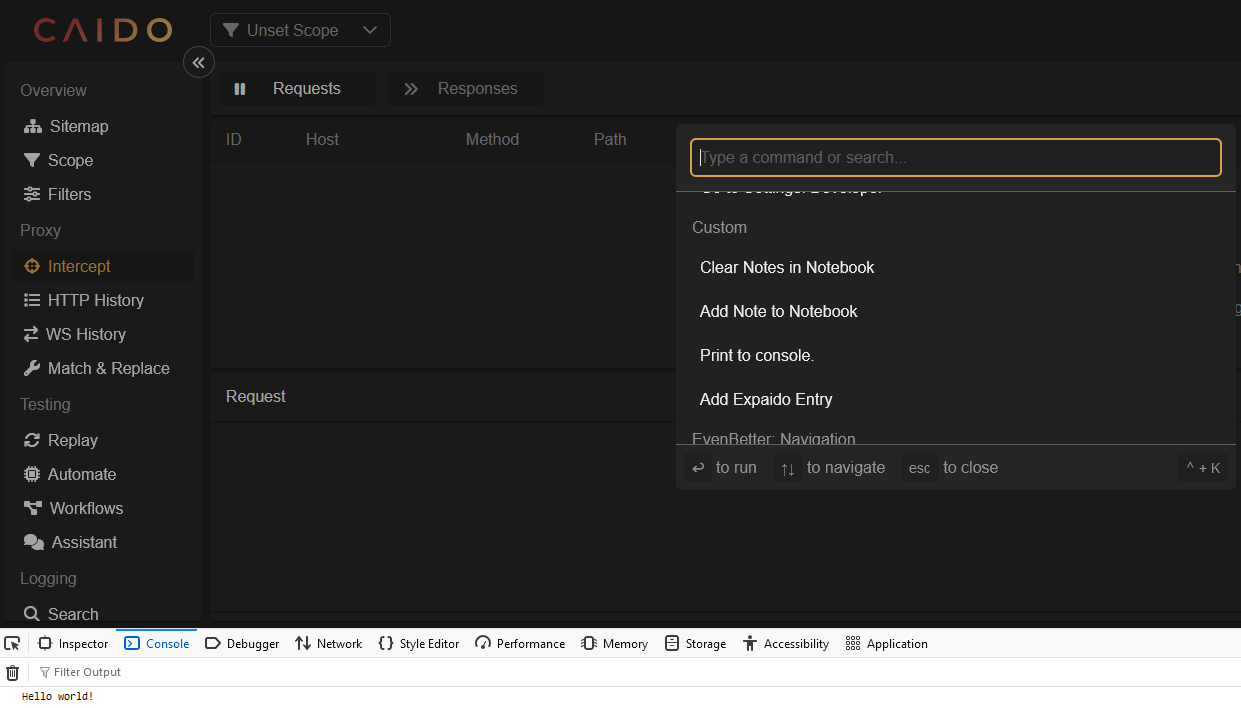
sdk.commands.register("hello", {
  name: "Print to console.",
  run: () => console.log("Hello world!"),
  group: "Custom Commands",
});
This creates a command.
INFO
The optional when property defines a conditional that must be met for the command to be available.
For example, to explicity set the command to be available at all times, when: () => true can be used.
To add a command to the commandPalette:
sdk.commandPalette.register("hello");This registers the previously created command to the command palette.
menu
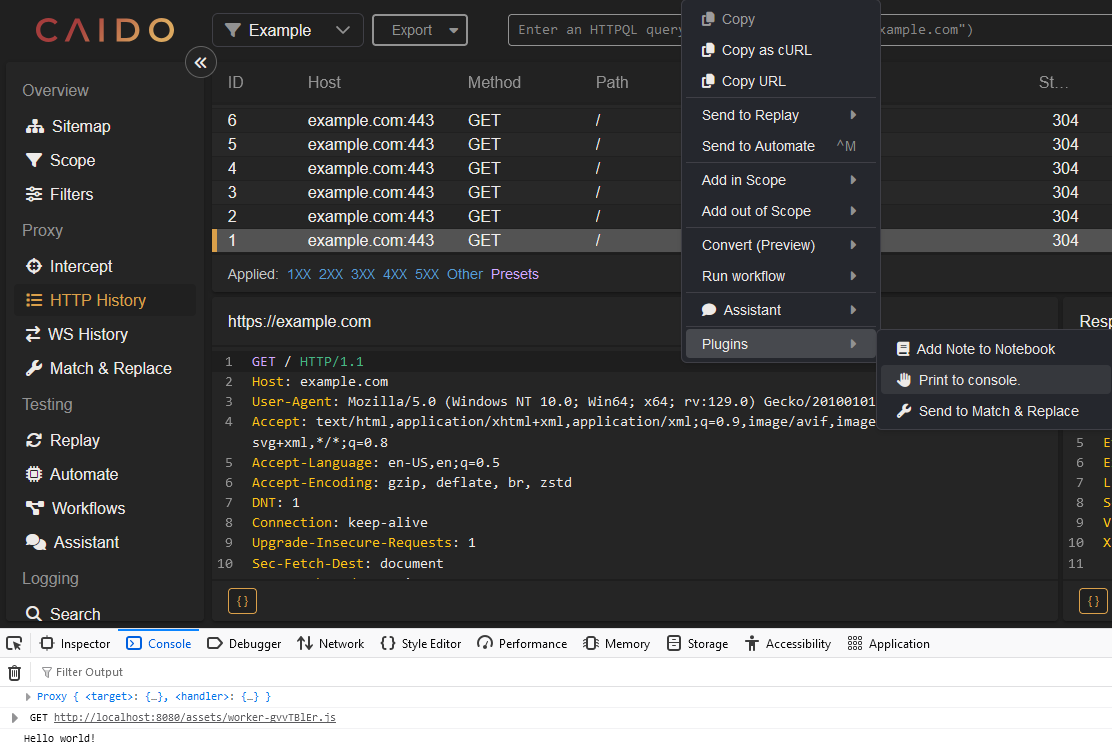
Used to register right-click context menu actions/options and create a plugin specific settings page, allowing quick access to your plugin functionality.
To register an entry to the context menu:
sdk.menu.registerItem({
  type: "Request",
  commandId: "hello",
  leadingIcon: "fas fa-hand",
});
This registers the previously created command to the context menu.
The type property specifies which context menu to add the action/option to:
Requestmakes it available when right-clicking in a request pane.RequestRowmakes it available when right-clicking on a request in a table.Responsemakes it available when right-clicking in a response pane.Settingsmakes it available when right-clicking in the settings menu.
The commandId value is the name of the registered command to execute.
The leadingIcon property is optional and adds an icon on the leading side of the entry.
INFO
When using the Settings value - an additional property of path exists which takes a string value of the path to be navigated to.
window
Used to interact with text within the application environment, allowing text selection, replacement, read permission designations, focusing and editor related messaging.
To interact with text within the Caido user-interface:
let currentSelection = sdk.window.getActiveEditor()?.getSelectedText();This takes the value of the current highlight-selected text and stores it in a variable.
sdk.window
  .getActiveEditor()
  ?.replaceSelectedText("Text that will replace the selection.");
This takes the value of the current highlight-selected text and replaces it with the arguement value.
To display a Toast message:
sdk.window.showToast("Message to display.", {
  variant: "info",
  duration: 3000,
});
This displays a banner containing the specified message.
All message properties are optional and include:
variant- Specifies the message type and can have a value of"success","error","warning"or"info".duration- Specifies the amount of time a message will be displayed in milliseconds.
TIP
For an example of how to trigger Toast messages on button clicks, expand the following:
Example
import type { Caido } from "@caido/sdk-frontend";
import type { API } from "starterkit-plugin-backend";

export type CaidoSDK = Caido<API>;

const createPage = (sdk: CaidoSDK) => {
  const messageButton = sdk.ui.button({
    variant: "primary",
    label: "Message Button",
  });

  messageButton.addEventListener("click", async () => {
    sdk.window.showToast("Message to display.", {
      variant: "info",
      duration: 3000,
    });
  });

  const headerText = document.createElement("h1");
  headerText.textContent = "Hello world!";

  const subText = document.createElement("p");
  subText.textContent = "Lorem ipsum.";

  const bodyText = document.createElement("p");
  bodyText.textContent = "Paragraph.";

  const footerText = document.createElement("p");
  footerText.textContent = "Footer text.";

  const headerContainer = document.createElement("div");
  headerContainer.appendChild(headerText);
  headerContainer.appendChild(subText);
  headerContainer.appendChild(messageButton);

  const bar = document.createElement("p");
  bar.textContent = "Topbar.";

  const card = sdk.ui.card({
    header: headerContainer,
    body: bodyText,
    footer: footerText,
  });

  sdk.navigation.addPage("/my-plugin-page", {
    body: card,
    topbar: bar,
  });
};

export const init = (sdk: CaidoSDK) => {
  // Register commands
  // Commands are registered with a unique identifier and a handler function
  // The run function is called when the command is executed
  // These commands can be registered in various places like command palette, context menu, etc.

  // Register page
  createPage(sdk);

  // Register sidebar
  sdk.sidebar.registerItem("My Plugin", "/my-plugin-page", {
    icon: "fas fa-rocket",
  });
};
storage
Used to persist data across different sessions or instances.
First define a data type in the frontend types.ts file:
export type PluginStorage = {
  count: number;
};
To store items:
const increment = (sdk: CaidoSDK) => {
  const count = getCount(sdk);
  sdk.storage.set({ count: count + 1 });
};

const decrement = async (sdk: CaidoSDK) => {
  const count = getCount(sdk);
  sdk.storage.set({ count: count - 1 });
};
To retrieve stored items:
const getCount = (sdk: CaidoSDK) => {
  const storage = sdk.storage.get() as PluginStorage | undefined;

  if (storage) {
    return storage.count;
  }

  return 0;
};
shortcuts
Used to register a command shortcut.
sdk.shortcuts.register("hello", ["Ctrl+Z"]);This registers a shortcut of CRTL+Z to execute the previously created hello command.